Thursday, May 10, 2018

Review: UWOWO Cosplay - Cafe Maid Nico Yazawa


Hi everyone! I'm sorry for the radio silence, I've been so busy with preparing for my competition at Anime Boston and my own full-time job. But I'm here with a review that I've wanted to do for a while now! This review is for the Cafe Maid Nico Yazawa (Love Live) cosplay from UWOWO Cosplay As I prefer to make my own costumes both for the craftsmanship and enjoyment, I don't often buy costumes so this was a bit of new experience for me.
                                                

***Disclaimer: This is my honest review. I have not been sponsored for this review, nor was I sponsored this costume by UWOWO - I bought it with my own money.


This costume retails for $59.00 on their site. I bought it for around $25 during their Black Friday 2017 sale.
Shipping and Packaging 
The package was shipping using JCEX. Shipping did take a while (about a month) but as it was coming from China that is what I expected so I can't complain. It came packaged in a large bubble envelope that was in good condition and not crushed or ripped or damaged as can happen with packages shipped internationally. It had some minor marks on the outside, but nothing major.


The costume itself comes in a large ziplock bag. The larger items like the dress, large back bow, and stockings were folded neatly. The smaller accessories look like they were jostled around a bit in transit, but that can't be helped. 


My shipping and packaging rating: 10/10

The Costume Itself

This costume contains 19 items: 2 hair bows, 1 hat, 1 treble clef pin for the hat, 1 neck bow, 1 dress, 2 gloves, 2 wrist cuffs, 1 large back bow, 1 side chain, 2 stockings, 1 garter, 2 leg cuffs, 2 leg bows.  The shoes and the wig are not included, but UWOWO does sell them separately. 


The craftsmanship of the sewing seems very good. The dress has a hidden zipper on the left side which is sewn beautifully. All seams are finished properly and looked good. Button holes on the dress are properly done and neat. Bows are sewn nicely, and the ones for the hair and neck are made of a nice velvety material. White fabric on the bodice is thin, but not overly so and is what you'd expect a dress or similar blouse to be made from. Patterned fabrics are thicker and allow the skirt some body while still being nice and floofy. The stockings are a sort of spandex material with elastics on the top and are intentionally not the same length.

Also worth noting, the model who is wearing the costume on the site is wearing 2 red wrist cuffs. The costume came with 1 red and 1 blue, which is accurate to Nico's card.

My sewing quality rating: 10/10

The next part is where we get into some trouble. The neck and back bows attach with safety pins. For the neck bow this is fine, but the back bow is heavy and pulls a lot on the dress with just the 1 safety pin they provided. I ended up adding a couple smaller ones to take some of the weight because I was concerned the fabric might pull and tear. Also, all of the bows are not attached to the middle strip holding them together. You could easily pull the bow apart, especially the neck and hair bows. Not a huge issue, just an observation.This can be easily fixed.

The side chain attaches with small claps to loops on the side of the skirt. I noticed immediately when I took the costume out of the bag that some of the plastic beads had chipping paint or were cracked entirely, like the picture below.


The garter, which is a strip of lace with a bow attached, attaches with a button to a loops inside the skirt and on the stocking. It attached to both fine at first, but the loop on the stocking wasn't securely attached and gave way about 5 minutes into wearing it. I didn't feel like reattaching it, so when I wore this at a con I just used a safety pin to clip the garter to the stocking. I would recommend reinforcing or even replacing the loop on the stocking.

My next issue is with the hat. The hat is attached to a plastic headband, and you attach the metal treble clef pin to that. The hat on its own is flimsy and wouldn't stay upright on it's own. Once the treble clef was attached, it would completely collapse backward under the weight as the pin is pretty heavy. In order to keep it's shape like in the photo below, I stuffed it with about 20 tissues.


The leg cuffs close with Velcro, and you attach the leg bows to them with Velcro. This Velcro isn't industrial strength and is pretty weak, and I was concerned that the leg bows wouldn't stay attached as they move with I would walk. Rightfully so, because I lost one of them at Anime Boston immediately after my photo shoot. I would recommend replacing the Velcro with industrial strength, attaching snaps, or sewing the bows onto the cuffs.

My accessory quality rating: 5/10

Sizing

Here's UWOWO's size chart for this costume:


UWOWO has different size charts for each costume, which is really nice and very helpful as not all costumes fit the same. Sizing is in cm on their chart so just pull up the conversation tool on Google. I ordered a size medium for this costume, and I'd say it's very true to size. I'm always a little nervous when I buy things in Asian sizes as they are notoriously small and I worry about whether it will be the proper fit. I was pleasantly surprised with this costume! I will say it is VERY short, and I would never wear this without shorts underneath. I'm short (5'0") so a pair of bike shorts did the trick, but you'll definitely run into some difficulty if you're taller. As far as I can tell, UWOWO does not offer custom sizing on their site (I can't attest as to their Taobao store as I don't use Taobao). They also do not offer any sizes bigger than Large, so if you're a plus size cosplayer you unfortunately will have to look elsewhere. 

My size rating: 9/10

Overall Thoughts

I was impressed by the quality of sewing and the construction of the dress. All seams were nicely finished and even. Sizing was great as well, as Asian to American sizing can be tricky. However, the accessories do leave a lot to be desired both in construction and durability. Some of these issues can be fixed, but my general attitude when buying costumes is I shouldn't have to go in and fix stuff. Knowing what I know now, had I paid the full $59 retail price I'd be more annoyed, but for the $25 I spent I can let some of it slide. 

My final review: 6/10

Photo by Bombeii Cosplay and Photography

That's all for now! Thanks for reading!

-  Birdie 💚


Thursday, December 28, 2017

Eli Ayase Ball Gown - Work Log Entry #1

Hey everyone! I'm with with Work Log Entry #1 for my build of Eli Ayase's Victorian Ball Gown from the anime Love Live! School Idol Project. Here's a reference photo of what I'm working on:

Image result for eli ayase ball gown

Before we get into the nitty-gritty, you may remember my last posts were reviewing the Lily Vanilla Diamond Sparkle wig from The Five Wits Wigs. This is the costume this wig will be used for! If you'd like to read my reviews of the wig, check out Part 1 and Part 2.

For the pattern, I'm modifying the McCall's Costumes M7213 pattern, which is based off of the live- action Cinderella film from 2015. 

Image result for mccalls 7213 pattern
The pattern is for a two-layered skirt (an underskirt, and an outer layer). My gown, however, has 3 layers - the bottom white/blue flowered tier (which you can just barely see in the reference photo but I found it on cosplay sites that are selling this gown), the pink/blue flowered tier, and the dark blue/light blue tier. And that is not counting the hoop skirt/petticoat, which I bought from Amazon and looks like this:

Image result for Petticoat, Women 6 Hoops Skirt Crinoline Petticoats Slips Floor Length for Bridal Gown
So this will be a BIIIIIIG dress. In my calculations, I've used about 23 total yards of fabric!

I started off with the bodice. I cut out 2 of each piece - one for the lining and one for the outer layer. I will add the fur trim to the straps and the navy blue section on the bust later. Eli's gown doesn't have a pointed waistline like the pattern, but I liked that look compared to the straight waistline so I decided to keep it. 

No automatic alt text available. No automatic alt text available. No automatic alt text available.

The bodice creation was pretty quick. The skirts are what took a VERY long time. Because I didn't want to spend a massive amount of money getting custom-pattern fabrics to be completely exact to the reference photo, I scoured my local Jo-Ann Fabrics to find the closest matches possible for the floral fabrics. I found a nice blue and white floral/fleur-de-lis fabric for the bottom tier and a pink and light blue floral fabric for the middle layer. Sorry this next photo is so dark! 😢

Image may contain: one or more people and text

I started with the bottom fleur-de-lis layer. Using the first layer as a guide, I cut out the next pink/blue layer to be q few inches shorter. 

No automatic alt text available.

Now, the top layer took some additional measuring (and mistakes). Unlike the other layers, the light blue is sort of a trim onto the darker blue, so I needed to measure out the darker blue and then attach the light blue panels (rather than doing simply a light blue layer and a dark blue layer). I used the pink/blue layer as a guide, and then just pinned on light blue pieces and trimmed them. 

Image may contain: text

Here's what the skirt layers looked like laid out and before adding some additional panels:

No automatic alt text available.

I then sewed all the panels and pieces together, which took A LOT of time and a LOT of thread. The total width of the skirts is about 70 inches, which will be gathered to fit the 30 inch waist of the bodice. Side note: I don't yet have a serger, but this is the first project that I've used my sewing machine's zig zag stitch to stabilize the seams for a more professional look. Not as aesthetically-pleasing as you would get with a serger, but pretty good. 

My grandmother used to be an avid sewer, and so she had a lot of materials lying around that she doesn't use anymore, including a huge spool of lace trim. I added this to the bottom of all of the layers, and "serged" the seams. This also took a ton of time, but was so worth it because it added such a beautiful flair. 


And that's where I left off for now! I'll be attaching the skirt to the bodice over the weekend, and will check back in with my next work log! As always, feel free to contact me/comment with any questions!

- Birdie 💚


Wednesday, November 29, 2017

Sponsored Review: The Five Wits Wigs - Lily Vanilla Diamond Sparkle (Part 2)

Hey everyone! I'm back with Part 2 of my review of the Lily Vanilla Diamond Sparkle wig from The Five Wits Wigs (you can read Part 1 here). To quickly recap, I was sponsored this wig from  The Five Wits for my Eli Ayase cosplay that I will be starting on soon. This part will discuss fit, quality, looks, etc. Please note that all photos do not have any filters which could change the color of the wig, and the wig has not been styled beyond a comb through for neatness (this is the wig straight out of the bag). So, let's begin!


As I said in Part 1, this is advertised as a very long wig, and that it is. On me, and I'm 5'0", it goes down to about my waistline. It's not extremely thick, but not thin either - I'd put it somewhere in the middle. 


This is the longest wig I've ever had, and like I said I did no styling to this other than a comb through with my fingers. The strands to get a little clingy/fly away when pulled away from the wig (which you can see on my shoulders a bit) but this is something to be expected with any super long wig. The texture of the wig is not very silky - it's more like real hair - so this does help with it not becoming a tangled mess really easily despite the fly away strands. You can also control this with hair spray or other products. I won't be doing much of any styling on this since it's already basically in the style I need, but it seems like it would lend itself to easy styling. 


Here's a look at the top of the wig (I brushed the bangs to the side with my fingers). It's not a skin-top wig, and like I said it's not extremely thick, so depending on styling or way the hair falls you may see the mesh of the wig cap and wefts at the top. Not a big issue, but something you may want to keep in mind especially if you're planning on doing a lot of styling. 

Overall, I really like this wig for the quality and the style!

Detailed Quality: 10/10

For reference, my head measurement is 22.5'' and I have lots of thick curly hair. As many wigs are, this one is a little tight on me, and I did not fasten the straps on the cap. Not blatantly uncomfortable, but I think this will be a wig that I will not be able to wear a wig cap with and will instead braid my hair and pin up because I don't think I could wear this for an entire day at a con without a headache. However, this is something I have to do with most wigs because of my hair plus the combination of wig cap and wig can give me a bad headache so I'm not really surprised. Here's what The Five Wits says on their site regarding sizing: 

"They are one size fits most. There are adjustable straps at the back of all the wigs to make them fit on bigger or smaller heads, and the cap is pretty stretchy. We test them on a model with a 23″ head circumference and waist-length (but thin) hair. If your head is quite large or you have a lot of thick hair we suggest completely unfastening the adjustable straps for the largest possible size"

Despite being very long, it isn't heavy, and doesn't drag your head back from the weight. Here's what the inside looks like (you can see the straps on the sides):


The wig is well-constructed, with wefts sewn very neatly in. The quality shows!

As far as fit, the only reason I don't give this wig a full 10/10 is because it is a little tight when I tried it on with my hair in a wig cap, and I know this would lead to a headache after a few hours. However, if you have thinner hair or thick hair and pin it up, it should be just fine. 

Fit: 9/10

Lastly, the wig came with a tag with instructions on how to care for and style it, which is great! I suggest keeping it somewhere handy - you never know when you may need it. 


All-in-all, I think this wig is of really nice quality! It retails for $40.00, and I definitely think it is worth the price! Especially with long wigs, you really don't want to get a cheap wig because it WILL tangle horrifically. This wig gives you great quality for less than more expensive long wigs which can retail into the hundreds. 

Money's Worth: 10/10

Rating Wrap-Up

To wrap up this review, here's my ratings of this wig and The Five Wits from both Part 1 and Part 2 in one place. I also want to mention that while I was sponsored this wig for free by The Five Wits, these are my honest reviews and evaluations (i.e. they didn't give me a free wig in exchange that I only say nice things). 

Customer Service: 10/10
Shipping and Packaging: 10/10
True to Advertised Color: 10/10
True to Advertised Style: 10/10
Initial Quality/First Glance: 10/10
Detailed Quality: 10/10 
Fit: 9/10
Money's Worth: 10/10

So that ends Part 2, and the quality-portion of this wig review. I will be posting Part 3 in a few months (likely April) when I shoot my Eli Ayase cosplay and I will talk about impressions of wearing this wig for a long period of time, styling experiences, and fit to character. Overall, I highly recommend The Five Wits - they have both quality products and great customer service! I actually ordered another wig from them during their Black Friday Weekend Free Shipping special for my Frank n Furter cosplay! 


(My shirt is from Nineteen Sixty Three Clothing

Thanks!

- Birdie 💚

Tuesday, November 21, 2017

Let's Talk About Body Paint


So, I've done quite a few cosplays with full or near-full body paint. These cosplays always go over well, and I always get a lot of positive comments and compliments on them. I also get a lot of questions, like what brand I use, how long did it take, how do I keep it from smudging or rubbing off, etc. In this (long) post, I will answer all those questions and do an overview of the body paints I have used, techniques I like, and tips to help you rock that body paint cosplay!

* Disclaimer: I have NOT been sponsored or endorsed by any of the brands I will be talking about today. These are my own opinions and thoughts on these products that I wanted to share with you.

Types of Body Paint

First, let's discuss the different types of body paint. The type of paint you ultimately choose will depend on a few different factors such as budget, needs (as in, will you be just be doing some designs on your face or painting your entire body), skill level, and skin type (as in, if you have really sensitive or dry skin, some paint types can harm your skin). 

1.) Water-activated/based paint

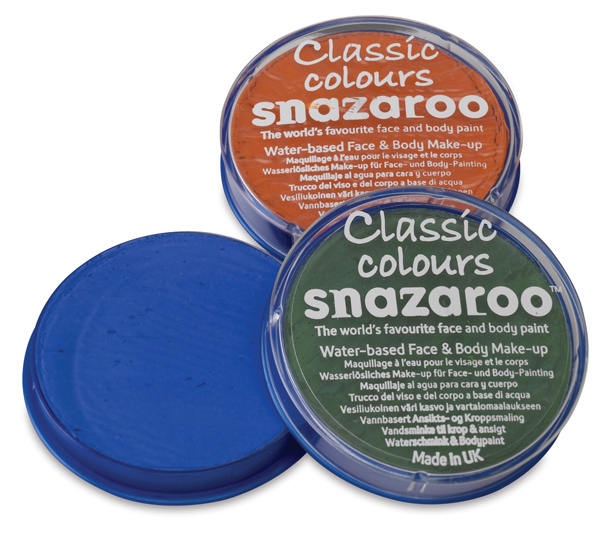
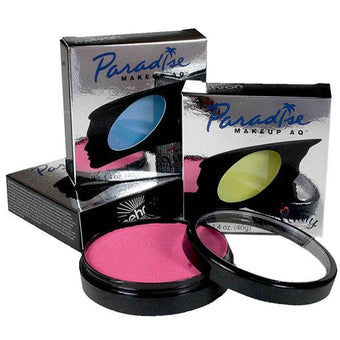
The most common and the most budget-friendly type of paint is water-activated paint. They come in a palatte or cake, and like the name suggests, this type of paint is activated by adding water and painting on with a makeup brush or sponge and also comes off with soap and water. When applying, be careful not to use too much water because you will dilute it too much and also take off the layer of paint you already applied. Examples of water-activated paint include Snazaroo, Mehron Paradise, and Kryolan Aquacolor. 
Image result for snazaroo Image result for mehron paradise paint Image result for kryolan aquacolor
PROS: Easily accessible (Snazaroo can be found at craft stores like Michael's, Aquacolor and Paradise online and at theatre stores), easy to apply, easy to remove, gentle on skin, easily removed from clothes

CONS: Cheaper brands may lack opacity, will come off with sweat if not sealed properly, will rub off on clothes and other people of not sealed properly, even with sealing will start to rub off after a long con day 

The more expensive the brand, the better quality you will get. For example, Snazaroo is the cheapest of these 3 brands, and I find it doesn't cover as well or stays on as well as, say, Mehron. 

2.) Alcohol-activated/based paint

This is the stuff you want if you want to your paint to be as perfect after a 15-hour con day as when you put it on. Alcohol-activated paint will not come off with water, so it's good for underwater shoots or days when you know you'll be sweating, and will not come off on clothes or other people (but that doesn't mean you shouldn't seal it 😉). These paints come in liquid form in a bottle similar to regular paint. However, these can be very expensive and generally require an airbrush to apply properly. Examples include ProAiir Hybrid and Temptu Dura. 
Image result for temptu duraImage result for proaiir hybrid
PROS: Excellent durability, waterproof

CONS: Expensive, require an airbrush, can be harsh on sensitive skin, requires alcohol to remove

3.) Creme and Grease-Based Paint

These paints often come in a little palette, and go on with a makeup sponge. They are often easy to find and reasonably priced. These have a tendency to rub off easily even when sealed, and may not be the best choice for full body paint. An example is Ben Nye Creme Color. 
Image result for ben nye creme color

PROS: Affordable, easy to apply, easy to remove

CONS: Rubs off very easily, harder to remove from clothes

4.) PAX Paint

You've likely heard of something called PAX paint. PAX isn't a paint itself, it's a combination of Pros-Aide adhesive and acrylic paint. It's extremely durable, but if you're wearing it in extreme cold, the Pros-Aide can actually shrink and you'll get a weird crinkly lizard-skin look. It's also known for being extremely difficult to remove. Also, the jury still isn't out on the safety of this. Pros-Aide is a prosthetic adhesive, so it's perfectly safe for skin, but regular acrylic paint is not meant for use on skin, and some types can even be toxic. Even those who swear by PAX say to not use it on your face or safety reasons. Personally, I don't want to have my skin absorbing something that is also used to paint prosthetics and props. 
Image result for pros-aide

PROS: Great durability, easy to apply with a brush

CONS: Extremely difficult to remove, question about the safety of painting yourself with paint not meant for use on human bodies

Additional Products

These products are absolute body paint MUSTS. Do NOT wear body paint without these items - lack of use of these is part of why everyone at cons hated Homestuck cosplayers back in the day (think grey paint on everything and everyone). 
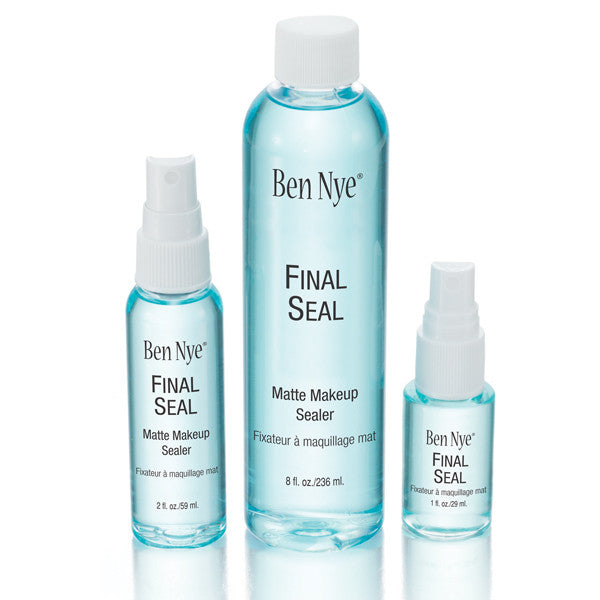
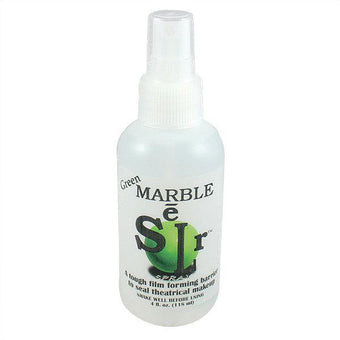
1.) Sealer

For the love of whatever God(s) or higher being(s) you believe in, please don't be that person that doesn't seal their body paint. Not only will it look really bad, but everything and everyone you some in contact with will be covered in whatever color you are that day. Don't be that person. Some cons even have rules against non-sealed body paint. 

I use Ben Nye Final Seal. Give yourself a nice spritzing after you're done painting (please close your eyes...). It's cheap(er), not harsh on skin, and has a nice minty sort of smell. You can also use Green Marble, which is alcohol-based and so provides great durability, but is very expensive and can be harsh on sensitive skin. 
Image result for ben nye final sealImage result for green marble sealer

2.) Setting Powder

I put this on with a kabuki brush after I use the Final Seal. I use Ben Nye Neutral Set, which goes on white but dries clear. You can also use regular powder, but it'll make you white as a ghost. 
Image result for ben nye neutral set 

What I've Used

1.) Snazaroo

Snazaroo was the first body paint I used. I use it for the black and red on my Red Core Rabbit cosplay. I apply with a brush and sponge, depending on the area (for my face and detailing, I use the brush, and for my neck and ears, I use the sponge). It applies decently, and stays on decently, but I find it doesn't apply as opaque or have as good durability as Mehron Paradise. Especially on my neck where I used the sponge, I found it can be a little splotchy, but for Rabbit I liked that it gave a sort of old-metal look which was appropriate to the character. If I wanted the paint to be my skin, I wouldn't have liked this look. I also use Snazaroo for GLaDOS' face markings, Bucky's eye shading, and War Girl's face markings/oil marks. I  also used it for Ahsoka's white facial markings. Overall, I think it works best for detailing and makeup that you want to look smudged or messy. It's superior to stuff you'd get at Walmart, but not as good as a more expensive/professional brand like Mehron. (Rabbit photo by Derpy Mermaid Cosplay & Photography, Winter Soldier photo by Bombeii Cosplay & Photography, War Girl photo by JMW Photography, GLaDOS photo by Godzilla vs Heisenberg.)
  

2.) Mehron Paradise

Mehron Paradise is by FAR my favorite paint. I used this for full body paint on my face, arms, and legs for Miss Martian. It applied like a charm with a little water and a makeup brush (took about an hour), and when sealed with Ben Nye Final Seal and Neutral Set, it didn't start to rub off until about 10 hours into wearing it and being outside for about 30 minutes in 95 degree August weather. This is now my go-to paint. (Photos y K. Brophy Studio). 

3.) Mehron Metallic

I didn't mention this in the paint types overview because I honestly don't know what type of paint you'd call this. Mehron Metallic comes in powder form in a tiny little container. You mix it with the Mehron Mixing Liquid and paint it on. I use it for the copper and silver for my Rabbit cosplay. It stays on really well with sealing, and comes off with water. (Photo by Derpy Mermaid Cosplay & Photography)
 

4.) Kryolan Aquacolor

I used Aquacolor recently for my Ahsoka Tano cosplay (along with white Snazaroo). It was recommended by other Ahsoka cosplayers, but I honestly still prefer Mehron Paradise and will switch to that in the future. The Aquacolor went on easily with a paint brush and sponge, but I found it was splotchy and not as durable or opaque as I would have liked/what I've gotten with Mehron. (Photo by Christopher Wetherell's Photography).


So that's it! If you have any additional questions about body paint, please leave me a comment! And make sure to subscribe via email if you like my blog! And as always, you can find me on Facebook and Instagram. Thanks for reading!

- Birdie ❤

Monday, November 6, 2017

Sponsored Review: The Five Wits Wigs: Lily Vanilla Diamond Sparkle (Part 1)

Hi everyone! Recently, The Five Wits Wigs graciously provided me with a sponsored wig of my choice from their shop in return for a return (Thanks, The Five Wits! I appreciate it!) I have received the wig, and will be writing my detailed review of this wig on here and on my Facebook page. I will be writing this review in several parts - I'll be starting today with my review of the shipping, packaging, and first impressions. Part 2 will be quality, fit, size, etc. Part 3 will be my final reviews once I have completed the costume I plan to use this wig for. So, let's begin with Part 1!

The Company: The Five Wits Wigs


First off, The Five Wits Wigs is a high-quality wig company based in the USA. They travel around to conventions, and you may have seen their wig booth before in your local Artist's Alley (I first found them at Anime Boston 2017). Here's what their About section on their site says: 

"The Five Wits is a geeky traveling business belonging to Ruth and friends. Maybe you met us at one of our many conventions, or maybe you stumbled across us on the Internet. However you got here, welcome! We’re artistscostumerswriters, and geeks of many fandoms. If any of this sounds familiar, you’ll feel right at home.We also run a site for our art and writing called The Five Wits Press, and our non-wig sales are made on our network site, The Five Wits."

Be sure to check out their site, they have an endless amount of wigs to choose from!

In my correspondence with them, I talked to Jessica and Birdy. I wanted to give them specifically a shout out for the wonderful customer service! You were both great to talk to!

Customer Service Rating: 10/10

First Glance: Lily Vanilla Diamond Sparkle

For my review, they requested that I choose 3 wigs, so that I had backup options in case my first choices were out of stock or unavailable. I was lucky and was able to get my first choice! The wig I chose is called Lily Vanilla Diamond Sparkle. Here's what it looks like on their website listing: 


And here is the description from their website listing: 

"This silky platinum blond wig has blunt cut bangs and luxurious length. This heat resistant wig is great alongside many different skin tones, and works for a lot of different characters. It’s easy to style, to set angle, and to make look amazing."

I chose this wig for my Anime Boston 2018 "Big Build:" Eli Ayase's Ball Gown from Love Live! School Idol Project. 


Shipping and Packaging

In my correspondence with Jessica, the wig was shipped using Priority 2-Day Mail on November 1 (Wednesday), and I received it on November 3 (Friday). It came from their site in Oklahoma to me in New England. The shipping was really fast, and the package came in great condition with no tears or rips. Now, I am also in the US, so I can't attest to the timeline to receive international orders. 


The wig came carefully packaged with a net and in a plastic bag. 


It's a very long wig, and in my past experience wrong or careless packaging can result in long wigs arriving tangled and gnarled. This wig arrived in perfect condition, with no knots or tangles! Obviously, I did have to run my fingers through it to straighten it out as it has been curled up for a while, but that is to be expected with any wig. 

Shipping and Packaging Review: 10/10

First Impressions

Here's the wig when I first took it out of its bag: 


For color, it was very true to the photos on the website (for what it's worth, all my photos were taken indoors and not in natural lighting). Something I did want to note was something that Jessica actually mentioned to me in her email. This wig is a platinum blonde/gold color (don't think platinum in the sense of, say Draco Malfoy 😆). Jessica mentioned that Eli Ayase's hair from screen shots is more yellow blonde. I do want to shout out that I appreciate the attentiveness of The Five Wits team, in that they took the time to look up the character to make sure I got exactly what I wanted (see my customer service review a few paragraphs up 😀). Personally, I chose this color because I wanted a more realistic tone for Eli. I feel like that REALLY yellow color looks great in the anime, but would look really fake in real life, so I chose this blonde instead. So, if you want a more true-to-life tone for Eli, this is a great color, but if you want that banana-yellow anime color, this isn't the wig for you. But like I said, this wig is definitely the color it is advertised as, and is just what I had in mind. 

True to Advertised Color: 10/10

This wig is indeed luxuriously long, as the website said. I'll talk more about this when I do my Part 2 review when I try the wig on and discuss fit and such. It has well-defined bangs as advertised, and it's beautifully even in terms of weft lengths (I've gotten wigs in the past where the length was not consistent throughout the wig, and it gave a very cheap, low-quality look). 

True to Advertised Style: 10/10 

The quality is very nice. It doesn't have the shine that some lower-quality synthetic wigs have that give them a very artificial look. The texture is quite nice as well - again very similar to real hair in that it's not overly-silky (which can lead to tangling). The wig base is very nice as well. It feels durable and of good quality without being bulky or leading to that "wig head" look (I'm sure you know what I mean). 

Initial Quality: 10/10

Well, that's all I have for now! Stay tuned for Part 2 over the next week where I will discuss fit, length, and go into more details once I actually try the wig on and post some photos for you to see it "in action."

Thanks again to The Five Wits Wigs! It's been a pleasure doing business with you!

- Birdie 💚